Create a list of related news items using Content Search Web Part

I thought it was built in initially. There is a Seach-driven Web Part called Recommended Items. However, it didn’t seem to meet my needs. Therefore, I created my own list using Content Search Web Part (CSWP)

This CSWP is similar to Content Query Web Part (CQWP) only it’s a lot easy (for me) to use. It has a preset of 5 lines to display information of each item.

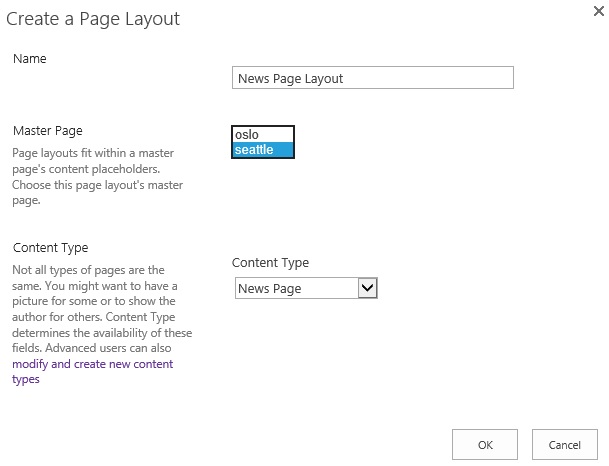
I am going to add this web part to my News Page layout, so every news page we create will have this related news items automatically. This is done through the Snippets as well. Read more about Snippets

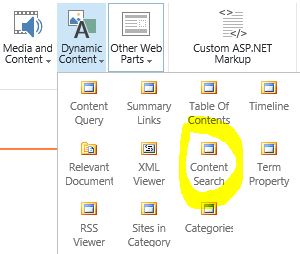
You can find the Content Search web part in the Design tab, under Dynamic Content menu.
contentsearch.JPG

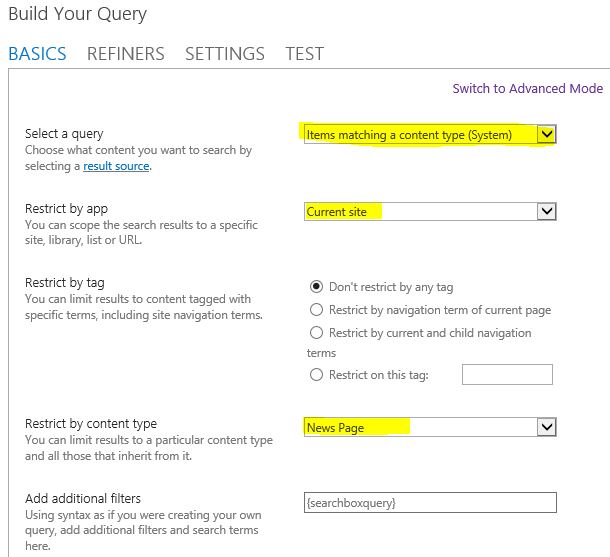
Once the page loads, I can set the properties of the web part including change query. In the basic view, I wanted the search brings up only the news page content.
basicsearch.JPG

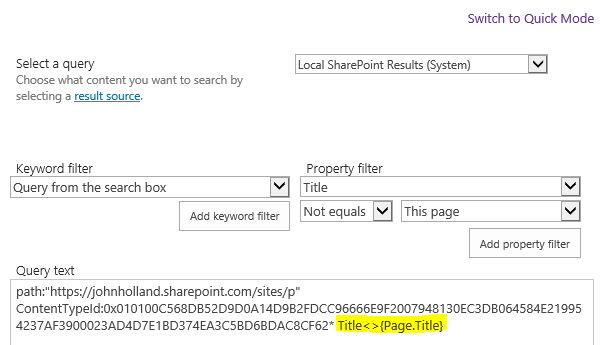
And by switching to the advanced mode, I can set the search to exclude the current page from displaying again in the related items list.
advancedsearch.JPG

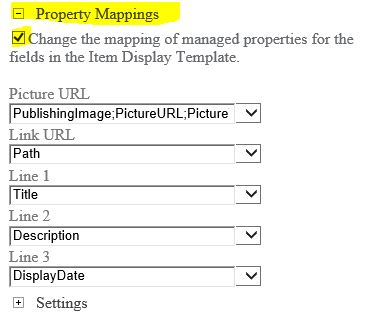
In the Property Mappings, I want the DisplayDate as the 3rd line for my news items. If you can’t see the Description or DisplayDate fields, add them into the search schema in SharePoint admin.
propertymappings.JPG

Note: It takes a few minutes for the new pages to be crawled and shown in the CSWP.

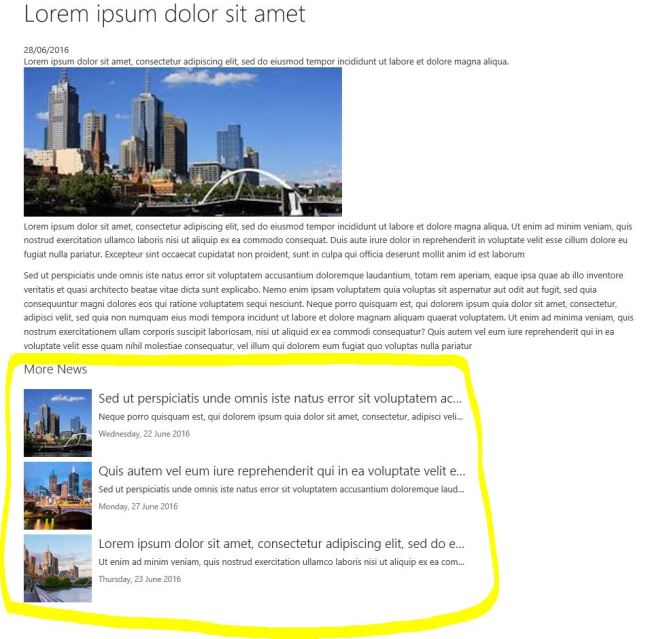
And my news page layout now has a More News web part at the bottom of the page. Notice the current news item is not in the list.
morenews.JPG


Custom Page Layout – hide fields from display

This is done in the HTML file of the page layout. With the Snippets, we can add in a piece of codes to make some fields only appear in the Edit mode.

Access Snippets

  1. Go to Design Manager
  2. Click 6. Edit Page Layouts
  3. Click on the name of the layout that you want to edit. This takes you to the Preview Page of the layout.
  4. You will find Snippets from the top right corner
    previewpage.JPG

Get the HTML Snippet

  1. Click on Snippets. Here you can find available controls that can be added to the page layout.
  2. Click Edit Mode Panel in the Design tab.
  3. Click Show Only in Edit Mode – this gives you a piece of code to hide fields from display
  4. As the page refreshes, both Preview and HTML Snippet boxes are updated.
  5. Click Copy to Clipboard
    htmlsnippet.JPG

Modify the HTML page

In this example, I’m going to hide the News Type and Active fields.

You can download the HTML page, edit it in an HTML editor, then upload to the Page Layouts library. Alternatively, you can edit the file in SharePoint Designer.
Note: you will need publishing features activated in both site collection and top site level to be able to see the Page Layouts folder. Find out how to activate the features

  1. Look for the syntax <!–MS:<asp:ContentPlaceHolder id=”PlaceHolderMain” runat=”server”>–>. Below this line, we have all the fields that are included in this page layout, eg Title, Article Date etc.
    placeholdermain.JPG
  2. Once I located the snippet of the fields I want to hide, I paste in the HTML snippet before the starting
    editmodesnippets.JPG
  3. Then replace the syntax
You should replace this div with content that renders based on your Edit Mode Panel Properties.

with the News Type and Active Snippets below it. So the end product looks like below
editmodefinish.JPG
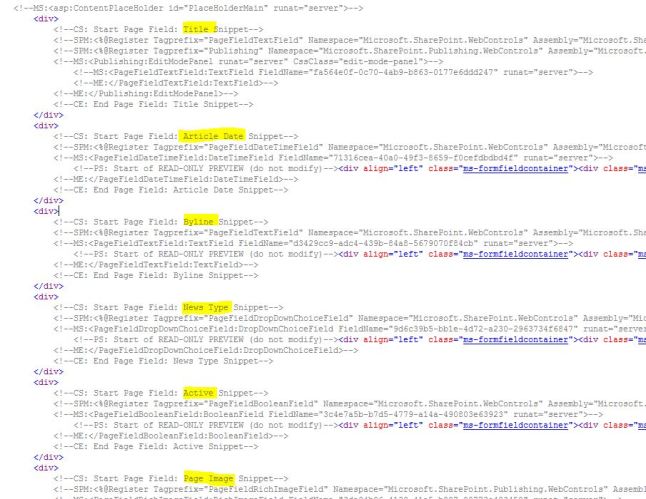
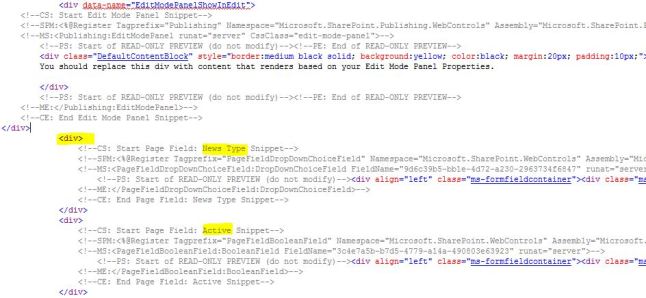
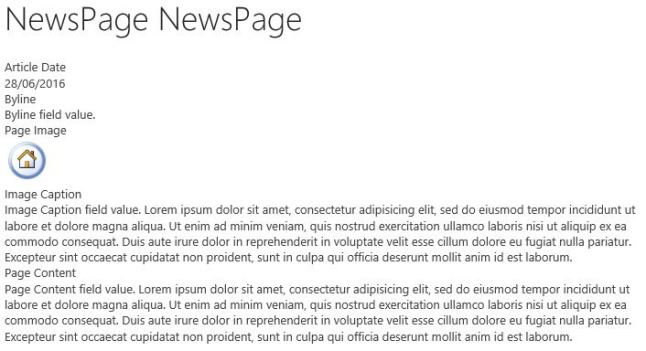
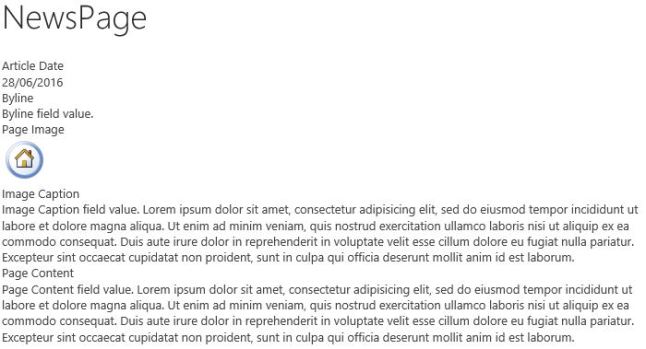
4. Save your changes and refresh the Preview Page. Here, the News Type and Active fields are gone.
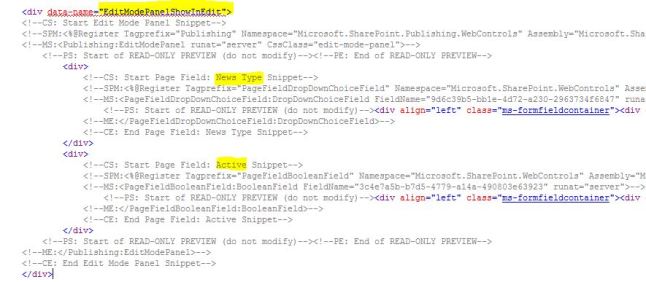
hidepreview.JPG

Noticed the duplicated page titles? Here is how to get rid of it.


Custom page layout names

There are three names associated with one page layout. As you are creating a new page layout, you’re asked to give it a name. It becomes both the Title and Name of the layout. And the content type you used to create the layout becomes the third name associated with it.

Page layout name

This is the name of both ASPX and HTML files that got created when a new layout is created. To follow the best practice, we use TitleCaseWithNoSpace.

Page layout title

By default, the title field copied the name. However, you can choose to have something more descriptive and human readable as the title. Below is a view of some existing page layouts in SharePoint Designer 2013. All the layouts have a different title to their name.
pagelayoutnames.JPG

To change the title, go to Design Manager > Edit Page Layouts, and follow the clicks as highlighted below.
renamelayoutpagetitle

pagelayouttitle

Content type name

Once a page layout is published, it appears in the Pages libraries of the site collection. As you click the New button in a Pages library, you will see the new content type, that you created the layout with, is added to the list.
newpage.JPG

One content type can be associated with multiple page layouts.

Example

Content type: Article Page

Page Layout names: ArticleLeft.aspx, ArticleRight.aspx, ArticleLinks.aspx

Page Layout titles: Image on left, Image on right; Summary links

Aside

Where is Web Analytics reports link in SharePoint Online?

It’s GONE!

Instead, we have Popularity Trends and Popularity and Search Reports in SharePoint Online.
web analytics.JPG

An even better news is that we can see the usage report on a specific file from a library, Files tab.
popularitytrends.jpg

You might have started wondering just like I did, and Yes, you can see the most popular items of the entire library too!
popularitems

Although I have to say, I still like the old web analytics reports better, because it gives me more information, such as top visitors. Bye bye Web Analytics 😦

Custom page layout – remove duplicate page title/name

When I firstly created the News Page Layout, I didn’t notice it at all! In the same line of Page Title, we have got a hyperlinked page name in front of the title. As I clicked the page name, the page refreshed, of course, it’s pointing to itself.

duplicatepagenames.JPG

It took me ages to google how to remove the page name. The closest I could get was one article mentioned the ‘double page title’, and the author removed the actual page title but left the linked page name there! No, that’s not what I want!

After several failed attempts, I finally found the control in the page layout’s HTML file. It sits inside the content placeholder id=”PlaceHolderPageTitleInTitleArea”.

Look for the syntax ContentPlaceHolder id=”PlaceHolderPageTitleInTitleArea” in the file, it’s the breadcrumb bit you will need to removed.

breadcrumb

Delete from the 2nd line to <!–SPM:</SharePoint:SPTitleBreadcrumb>–>, see highlighted above, and save the file.

Here, you will only see the page title now, and not hyperlinked.

nobreadcrumb.JPG


Create a news item page using a custom page layout

Before we go ahead and create a new page layout from the Design Manager, we have to create a custom content type for this layout. Site columns included in a content type defines the fields available on a page.

Create a Custom Content Type

  1. Go to the site collection top site, Site Settings page
  2. Click on Site content types under Web Designer Galleries
    Note: if you scroll down to the Page Layout Content Types, you will see some familiar names, such as Article Page which is associated with the Article Page Layouts
  3. From the top of the page, click Create
  4. Give this content type a name, for example, News Page
  5. Select parent content type from Publishing Content Types, and make Page the parent content type
  6. Choose a group, eg Custom Content Types
  7. Click OK

new content type

Once the content type is created, you will be taken to the Site Content Type page to manage the columns. The columns are copied from its parent content type, ie Page. You can modify the columns to suit your needs. In my case, I added a few more columns, most of them can be found on an article page:

  • Article Date – this is the date gets displayed in an article, different from when you created it
  • Byline – a short description line that can be used in the summary web part
  • News Type – this is a new site column I created to categorise my articles
  • Active – a checkbox, so I can hide some articles from view
  • Page Image – pre-defined image area
  • Image Caption – caption box for the page image
  • Summary Links

For the columns I don’t need, I made them hidden, so users won’t see them on either edit or display mode. Also, I changed the column order. It sets a good starting point for us later on editing the page layout. And below is my final product:

columns

Now, we have our new content type set, we can go ahead creating a new page layout.

Create a page layout

  1. From the site collection top site, click on the gear icon to bring up the settings menu, click Design Manager.
    Can’t find Design Manager anywhere? Read here
  2. In the left pane, click the 6th item Edit Page Layouts
  3. Click Create a page layout
  4. Create the News Page Layout using seattle Master Page and pick the content type you just created, ie News Page.
    Why seattle? Read here
    Create page layout
  5. Click OK to proceed
  6. When the layout is created, you will see it on the Edit Page Layouts page. To make the changes, you can either download the file or change it through the SharePoint Designer.
    draft layout.JPG
    Note: when a page layout is created, two files (.aspx and .html) are generated together. Anything you updated in the HTML will be reflected on the ASP page. However, if you changed the ASP page, it won’t let you save, because the changes won’t get translated to the HTML file automatically. You can manually break the link between these 2 files if you know what you’re doing.
    For editing, read
  7. Once you have finished editing, you will need to check in the file and publish it as a major version, so it’s available in the Layouts list.
    publish page layout.JPG

Now, you will find the News Page Layout in the Pages library.

pagelayout.JPG

It’s also added to the New Documents list.

newdoc.JPG

Thanks goes to the authors of these 2 articles I found online:

http://www.learningsharepoint.com/2013/03/03/create-a-custom-page-layout-in-sharepoint-2013/

http://www.dotnetcurry.com/ShowArticle.aspx?ID=638


Aside

Getting error on clicking Snippets

I was trying to add some snippets to my newly created page layout and I got this:

Sorry, something went wrong

An unexpected error has occurred.

After a few unsuccessfully attempts, I started googling…

Apparently, it had something to do with the site columns. I created this content type based on the Page content type, and the columns are just copied across, I didn’t add any new columns. This actually caused some problem here (not sure why yet). So, I added a column. It doesn’t matter if it’s an existing of new, as long as it differs from the parent content type. Wallah, the Snippets is back in action!

Turn on publishing features

Turn on the publishing feature at the site collection level

  1. Go to the site collection top site, Site Settings
  2. Click Site collection features under the heading Site Collection Administration
  3. Look for SharePoint Server Publishing Infrastructure, and click Activate next to it.
    Note: Once publishing features are activated, subsites inherit them automatically. But, if you built a site before activating the publishing infrastructure, you’ll have to manually activate it for each site.

Turn on the publishing feature at the sub-site level

  1. Go to the sub-site you wanted the publishing feature on, Site Settings
  2. Click Manage site features under the heading Site Actions
  3. Look for SharePoint Server Publishing, and click Activate next to it.

If you’ve successfully turned on the features, you will see a few new libraries added to your site. Read the full list of features enabled

Link

Master pages: oslo vs seattle

Whats the difference? Yes, I had the same question when I was creating the custom page layout for my new articles. I didn’t know which one to pick. And yes, I googled.

In short, oslo doesn’t have the left pane which is more for the publishing sites; seattle provides the left pane, the standard SharePoint team sites we normally see are built from it.

See the full-blown answer here…

Interesting fact: Oslo is a city in Norway, and Seattle in USA, flight duration is 11h50m 🙂